Okay. So I've always loved watching those shows like Cake Boss or Ace of Cakes. I love watching cake decorating and dream up ways to make unusual cakes. Since this experiment, I've decided its best left to the experts.
A few days ago, I came across a blog posting about an American Flag Cake. It didn't look TOO hard, maybe on the level of the rainbow cupcakes or something. I could do it, right???? (If only I'd known then what I know now....)
I started out about 1pm.
I had purchased one box of white cake mix***. (BTW- the little *** mean to go to the bottom of this post where I tell you all the of the things you should do to avoid the problems my cake had. Basically, what I'm going to do next time). I realized I would actually need about two. So I found a quick and
easy white cake recipe and added it to my cake mix.
Not bad. So far, so good.
Now, in the original recipe, the cake was just left as plain white cake. I thought that was boring. So I added flavored jello. To give it some color and a kick of flavor. Red for the red portions and blue for the blue cake.***But I'm getting ahead of my self.
Once you've mixed up enough white cake mix for two cakes, take out two cups of the batter. Drop some blue food coloring in there. I also mixed in some blue raspberry jello. When you've got it to a good blue color, put it in a cake pan. I lined mine with wax paper. I also don't recommend this. I found in the end it was easier to trace the cake pan circle on wax paper, cut it out and put it in the bottom of the cake pan. Squirt that sucker down with Pam and you're good to go.
I digress....Anyways, put the two cups of blue batter in the cake pan.
Now bake it on 350 for about 20 minutes. When it comes out, dump it out of the pan right away to let it start cooling.
Now, while the blue cake is baking there are two very important tasks you must accomplish. First is to get the red batter ready. Mix the remaining batter with red food coloring until it's a violent shade of florescent red***.
Once its there, divide it into seven equal portions. After all, our flag has 7 red stripes.
Then after you've accomplished that, go ahead and start tracing and cutting out your wax paper circles that will go in the bottom of your cake pans. You'll need seven.
By now, the blue cake should be done. Pop that puppy out of the pan and let it start cooling.
Totally unnatural right??? Anywhoo...
Put a wax circle in the bottom of each cake pan. Hose those suckers down with some Pam. Drop the pre-portioned out batter into the pan. It would help if you had multiple cake pans. I however, only had two so I had to bake in cycles***. Throw the pans in the oven for about 10 minutes. When they get done, pop 'em out of the pans and throw the next portion of batter and wax circle in and bake those for 10 minutes. And so on...
My sous chef was very helpful at this point.
Eventually get all of the cakes baked and set out to cool.
Luckily, these suckers cool pretty quickly. Get ready to start assembling.
For the first 4 layers, straight up ice and stack. WARNING: You will use a TON of icing on this cake. I thought two containers of frosting would be enough. I was wrong. You'll probably need more like 3-4***.
Once you get to the fourth layer, give it a good solid coat of icing. Now look around your kitchen for a circular object to trace. You're creating the center of the cake, or the red stripes that correspond to the blue of the flag. I found an oatmeal can was the perfect size. Trace the circular object onto our old friend, wax paper. Now cut the circle out of the last three red layers. Begin stacking and icing these layers like you did the last ones.
Here's what it looks like from the side when you've stacked enough (never mind the other blog post on my laptop in the background....)
Now is time to add in your blue. Take that same circle you've been using to cut out the red layers and cut in out of the blue. But you're going to use the OUTSIDE circle this time. You can cut the blue cake into four pieces to make it easier to manipulate. Put them around the outside of the red layers.
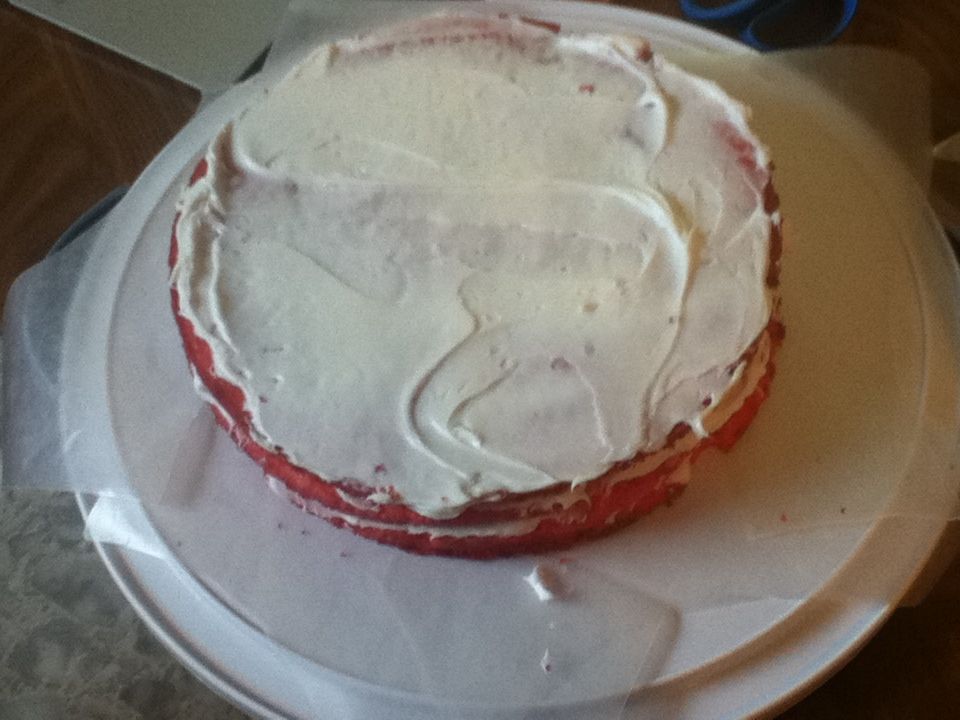
Once you've added all of the blue outside layers, put a crumb coat of frosting on it. Put it in the fridge for about 30 minutes. Then add more frosting to the outside, creating kind of a whipped appearance.
Ideally, it should look something like this (this is not my cake. I had to hurry up and go BECAUSE IT WAS NOW 4:30!!!! so you can pretend this is my cake. Except that mine had patriotic sprinkles on it.) That's right. This cake took 4 and a half hours to make***. Seriously.
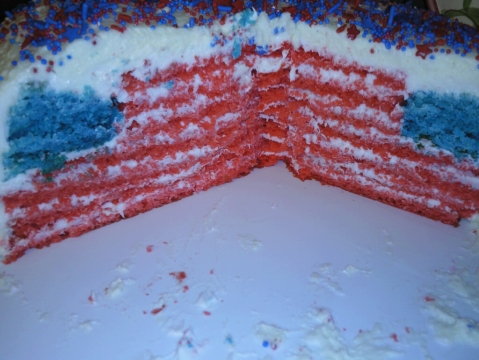
Here's what the inside looked like:
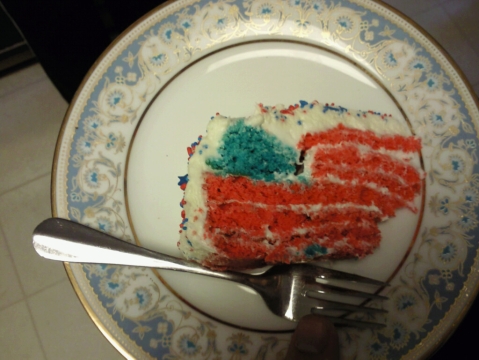
And a piece of it...
The effect was really cool. Lots of OOHS and AAAHs. But once you took a bite....not so hot so. It was totally fake-y tasting. Like gross fake-y tasting.
So here is what I would do differently next time...
1. I would not use white cake mix. I would use Red Velvet cake mix. I think it will make the cake look a little more crimson and a little less florescent. Plus I think the flavor would be better. For the blue part I'd still use white with blue food coloring. (Unless anyone else has any ideas?)
2. DO NOT USE JELLO. Oh, this was a horrible idea. The flavor was all playdoh-ey, and it made the batter super rubbery and impossible to use. Gross.
3. Forget all of this mini cake baking. I would bake probably two round cake pans full of red velvet cake batter. Let it cool. Then using floss, I would divide them up into 6 equal layers. I know the flag has 7, but really- who's going to count? And hopefully this will help cut down on some of the time it takes to make this cake.
4. Use a really good home made cream cheese frosting recipe. This cake needs tons of frosting. Like TONS. And you taste a lot of it. You can't squeak by with some store bought frosting. No, that's gross. You need homemade super good high qual frosting if that's going to be the main flavor of the cake.
So yeah. There it is. The beast. It was definitely an adventure.